Bullet Bra Sew-Along day 1 Download the pattern and get sizing info
Bullet Bra Sew-Along day 2 Cut and assemble the cups, learn about circle stitching
Bullet Bra Sew-Along day 3 Attach the front and size bands and make sizing adjustments in the band
Bullet Bra Sew-Along day 4 Finishing the bra and attaching straps and closures
Today, we'll finish the edges, attach the straps and do some optional lingerie elastic.
Let's talk about lingerie elastic real quick. The first bra I made, I did without the elastic and it was a great, comfy bra. This time around, I wondered if I might get a better fit with some elastic so I tried it and it really added to the comfort for me. Again, totally optional. The elastic is the last step so you can try without first and if you want to give it a go, the instructions are here. If you chose to not use lingerie elastic, you may want to finish the bra with some bias tape
Anyway, let's do this!
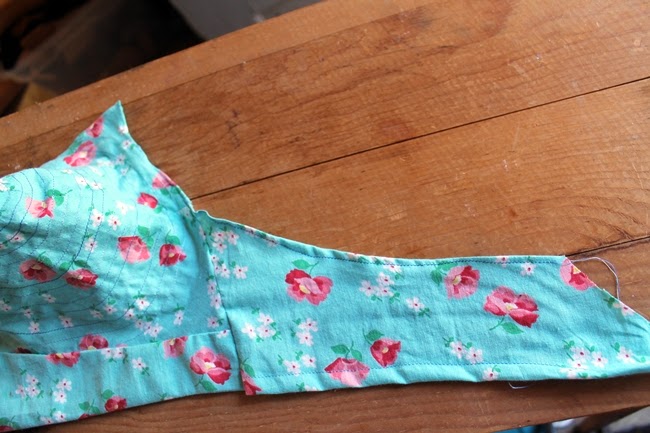
By now, the unfinished edge will be along the top of your bra. Turn this edge under just 1/2 inch, press and sew.

When you reach the strap attachment area, fold these into a point, fold over and stitch

Let's Talk About Vintage Bra Straps Real Quick.
Most of my vintage bras have these irritating little things in either plastic or metal, which are attached to the strap with a twill tape or bias tape loop and you're supposed to adjust the length of your bra strap. The metal ones are fine. The plastic ones totally suck because they break when you're out and about and your bra strap is flying loose, boob falling out and there's nothing you can do about it. So, if you choose to use the "vintage method" of strap attachment, shoot for metal ones or nylon coated metal, if you can find them.
Our bullet bra pattern strap attachment is not at all vintage because those things drive me crazy. Another problem with the vintage strap slide is that if you have heavy breasts, the weight of your breasts, causes the strap to fly out of the slider and your boob falls out of your bra and you run to the ladies room with one boob bouncing free inside your blouse and strap hanging all over the place. Not so good. I stitched all of my vintage straps down after the 90th time of those shenanigans. Anyway, on to attaching your straps....
Pin your strap into place at both strap attachment points. On the front, sew a little triangle so the strap is very sturdy. You can hand sew little ribbon bows here if you like or, like I did, curve your lingerie elastic around this area, continuing through the upper cup

Attach strap to side band. Sine we're all different shapes, you may need to adjust the attachment point for your bra strap at the side band.

Ladies, if your breasts are very heavy and straps tend to dig into your shoulders, try a wider strap. You can order wide bra straps here or make or purchase some shoulder cushions. Many of my vintage bras have shoulder cushions and they really do make a difference if you have heavy breasts.
Pin your lingerie elastic to the inside of the bra, along the outer edge and sew. I sewed elastic along the top and bottom of the bra. Not a necessity at all but I like it! I did a wonky job of it very late at night but you get the idea...
Vintage Bra Closures
All of my vintage bras and all that I've found for my etsy shop have a modern looking hook and eye closure but some vintage bras had a really beautiful closure with a G-hook, which I love. Anna from Mrs Depew Vintage has some gorgeous repro closures like this in her shop.
I hope that you ladies enjoyed the pattern and sew-along. I don't think a project has ever made me drop as many F-bombs as this one did but it was worth it! For the cost of one modern bullet bra, you can sew over a dozen of your own and you'll know that it's the right size, color and materials. I will be updating these patterns with more sizes as I get new models to test them on. For updates on sizes and other blog happenings, sign up for my monthly newsletter.
If you need bullet bra pads to fill in the pointy cups, you can purchase them from What Katie Did or sew your own using this YouTube tutorial
I'd love to see your finished bras and bullet bra inspiration so join the group Pinterest board "Va-Voom Bullet Bras"
For questions, email me at brittanyvavoomvintage@gmail.com or leave questions in comments below


Great job! I was just thinking about straps and thought it might be cool to just have fabric straps that you could button down in the back. You could have several different buttonholes so that you could adjust the length and maybe even crisscross them in the back.
ReplyDeleteI think that is a great idea. Did you try?
DeletePLEASE make them for resale! I would LURV a gorgeously girly bullet bra....mine are all boring beige and white!
ReplyDeleteVintage style G-hook closures are so wonderfully lovely. I really wonder why more bars aren't still created with this elegant hook style.
ReplyDelete♥ Jessica
Have you worn your BB yet? I was wondering if it differed any in comfort?
ReplyDeleteI have owned bullet bras in the past and as long as they fit you right they are the best bra ever. Mine were made just for me and went with my oddities....{I had a fatty narcosis removed which took a chunk of my boob}so that you couldn't even tell I was a bit smaller on the left side. I also like how they lift and define my boobs. They aren't rounded and slightly saggy like other bras, even brand new ones
DeleteThey stand up and are just as perky as can be almost like the days when I didn't need a bra for them to stay up. Oh, another advantage depending on the material used. No nipple definition in cold weather, cold rain, etc. I prefer cotton for its sweat wicking ability. Anything 100% cotton should be checked to see if it has been preshrunk. If it hasn't make sure to shrink it before making your bra's. Nowadays cotton comes in so many pretty prints and colors. Sexy bra's don't have to be made out of satin and lace. Let's face it, most men will pay attention to what your wearing but their minds are generally quickly diverted elsewhere. lol. Anyway, that has been my experience with bullet bra's and I plan on making a few in the future. However I will have a friend do some measuring for me instead of me trying to finangle these big girls with one hand while measuring with the other. Not possible. Have a great day/evening everyone!
Thank you SO much for making the pattern and this fabulous tutorial for free for us, Brittany, you are a true darling. I have downloaded it and will make it the coming Winter. I am way to busy to do it now, but I am looking much forward to try it. lots of e-hugs from Sanne, Denmark
ReplyDeleteI wish I could sew as well as you! I'm terrible at sewing and crocheting. Just to let you know, Revlon is coming out with Five limited edition lipsticks in 2014. The shades are discontinued colors including a red from the 50s! There is also a violet from the 40s and two peach shades from the 50s.
ReplyDeleteI couldn't help but laugh out loud while reading about your experiences with the vintage strap slides. It sounded like a horrible thing to go through but your description was just too funny. I enjoyed reading this post. And thanks for the sewing tips!
ReplyDelete-Viola :)
Thanks so much for posting this tutorial!! I'm not in a place financially to spend money on patterns (3 kids+husband in grad school), and I had been longing for a vintage bra pattern for 2 yrs.
ReplyDeleteYou're so completely awesome =)
I'd found, trying to get a slightly less dramatic (more 40s??) look, I just added more fabric in the top cup thus making the top half's "angle" less steep, without changing the bottom half. Thank you so much!!!
Great. I am also thinking about making one, that is less pointy, so your advice is great. I was thinking about taking off some fabric, but that would reduce size too, so your way is better. Do you have a photo somewhere of yours?
DeleteJust finished my bullet bra today! Thanks for hosting this, it was a lot of fun. You can read about my experience here: http://purplepincushion.wordpress.com/2013/11/03/bullet-bra-complete/
ReplyDeleteI've just finsihed my bullet bra too!
ReplyDeleteI loved making it and will tweak the design for my shape and make it again! I'd love to upload my photos to the Pinterest board but I don't know how to...when I click on the link above I get an empty page.
Okay, so I have been wanting to make one of these! I just found your blog and I am so excited and thankful for this!!! If I wasn't currently surrounded by co-worker I would jump for joy! So excited and beautiful work!
ReplyDeleteDid you ever do a tutorial for the bullet bra pads? I wasn't able to find anything. :)
ReplyDeleteno, I sure didn't! Time got away from me. You can find one here though : http://www.missbeevintage.com/2010/07/guest-post-diy-bullet-bra-pads.html
DeleteIs there a printable file that includes all the instructions in one place?
ReplyDeleteno, they're all in the sew-along. I had hoped to make a pdf of the instructions all together but I never found the time!
DeleteThank you so much. I like, that it uses simple cotton fabric, and so simple to make. I don't want it so pointy, so i will try to make top cup at a gentler curve. And I 'll try use regular fabric for straps with some buttons to be a bit adjustable. Still thinking about the closure...Those hooks always annoy me. Maybe I could use 2 or 3 small buttons?
ReplyDeleteI have a horrid vintage habit, and all my sewing projects end up half finished and strewn about. This one seems like it could be done quickly enough to prevent little hands from ruining it! I love that you've made this free to do/use. If I end up successful, I'll send a snapshot :)
ReplyDeletewait! How to you close/fasten the back? Did I miss something?
ReplyDeleteI posted this ages ago and you're the first to mention that I didn't really cover how to sew the bra closures to the back! LOL! Anyway, when you purchase a bra hook closure set, it's hooks on one side and loops on the other side, sewn to a strip with elastic on it. You just pin it to each side and sew it on and you're set! Alternatively, you can hem the back edges and hand sew hooks and loops directly to the fabric but I think the elastic definitely helps it fit well if you lose or gain a pound or two and it's a much more durable closure. Hope that helps!
DeleteHello
ReplyDeleteDid you ever do the bullet bra pads? I can't see them but this is probably operator error - I sew much better than I work computers!! Can you help please? Have printed the pattern, now have to adjust fit for FF cup, fingers crossed!!
Many thanks and best wishes
I never did but here's a link to a good bullet bra pad tutorial! : http://www.missbeevintage.com/2010/07/guest-post-diy-bullet-bra-pads.html
Delete