bullet bra sew-along
fashion
vin
Wow, what a wonderful response from yesterday's post on my bullet bra pattern! I worked out cup sizes B-DD yesterday and YES, I will be doing the biggest cup sizes that I can, for all of my "heavily blessed" sisters out there.
This pattern will be a little unique too, in that you will be able to choose your cup size and band size separately so if you have a small rib cage and big girls, or vise versa, you can get a perfect fit. There's some extra math involved and since I have the math capacity of a kindergartener, I'm doing my best to make it simple.
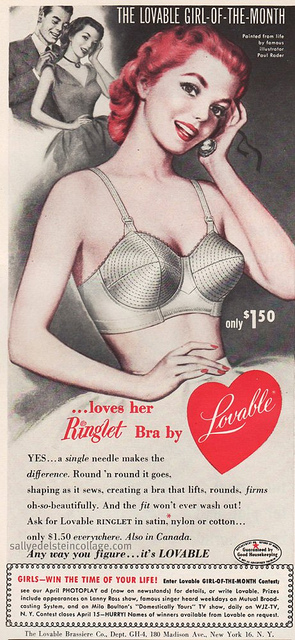
I have always said that the single most important garment that a woman should have is -not- a little black dress but a perfect fitting bra. A great bra makes you look good and feel good inside and out. When your girls are perky and lifted, you walk taller, smile bigger and feel fabulous!
Since I started this blog, it's been all about embracing your body for what it is and understanding that we all come in different shapes and sizes. It's funny that we are all completely different sizes and shapes but we all share the same problem- finding a perfect bra!
My sister, sister-in-law and mom have generously agreed to let me borrow their boobs so I can test out different cup sizes before I post this thing. Thanks, family!

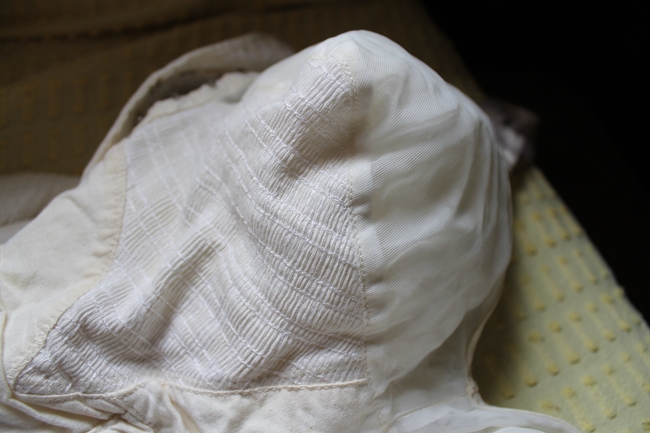
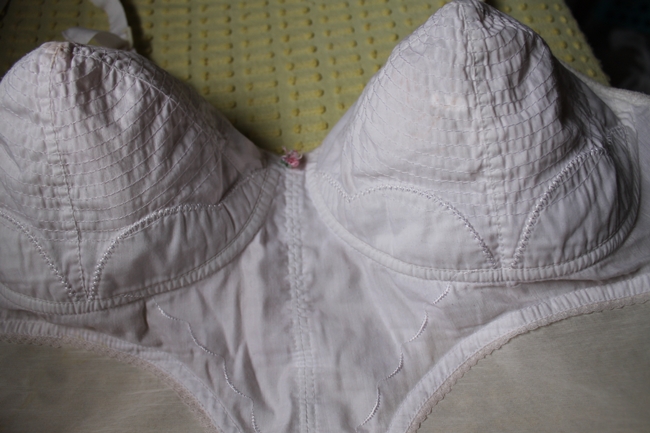
Anyway, while I was working out sizes yesterday, I sat in bed in a pile of my vintage bra and girdle collection and wanted to show you all of my bullet bras from simple cottons to embroidery and sheers. I hope that these original bras inspire you in your bullet bra sewing!
I always love to check out vintage lingerie to see how it was constructed and all of the little details.Although I wear this stuff all the time, I'm not in the habit of showing off my undies until now! I'll be going over instructions on how to create these unique stitching patterns, using lace or sheers and all the details that make a handmade piece of lingerie really special.
Although they look quite complex, bra sewing is very easy and fun! Once you get your size correct, you can knock out a few of these in an afternoon with very little fabric.
My Vintage Bullet Bra Collection
4/27/13
Wow, what a wonderful response from yesterday's post on my bullet bra pattern! I worked out cup sizes B-DD yesterday and YES, I will be doing the biggest cup sizes that I can, for all of my "heavily blessed" sisters out there.
This pattern will be a little unique too, in that you will be able to choose your cup size and band size separately so if you have a small rib cage and big girls, or vise versa, you can get a perfect fit. There's some extra math involved and since I have the math capacity of a kindergartener, I'm doing my best to make it simple.

I have always said that the single most important garment that a woman should have is -not- a little black dress but a perfect fitting bra. A great bra makes you look good and feel good inside and out. When your girls are perky and lifted, you walk taller, smile bigger and feel fabulous!
Since I started this blog, it's been all about embracing your body for what it is and understanding that we all come in different shapes and sizes. It's funny that we are all completely different sizes and shapes but we all share the same problem- finding a perfect bra!
My sister, sister-in-law and mom have generously agreed to let me borrow their boobs so I can test out different cup sizes before I post this thing. Thanks, family!

Anyway, while I was working out sizes yesterday, I sat in bed in a pile of my vintage bra and girdle collection and wanted to show you all of my bullet bras from simple cottons to embroidery and sheers. I hope that these original bras inspire you in your bullet bra sewing!
I always love to check out vintage lingerie to see how it was constructed and all of the little details.Although I wear this stuff all the time, I'm not in the habit of showing off my undies until now! I'll be going over instructions on how to create these unique stitching patterns, using lace or sheers and all the details that make a handmade piece of lingerie really special.
Although they look quite complex, bra sewing is very easy and fun! Once you get your size correct, you can knock out a few of these in an afternoon with very little fabric.
bullet bra sew-along
fashion
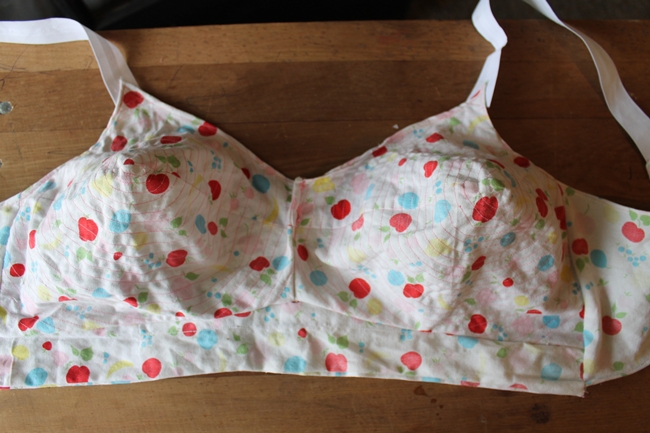
Yesterday, I finally sewed a bullet bra- something that has been on my must do list for years. I created the pattern, cut the fabric and completed the whole bra all in about an hour. It's my first attempt and needs a few more small changes to make it perfect but I am so pleased with it!
I used this silly fruity print cotton from my stash. I love this bra to pieces. It's so comfortable, I could sleep in it! As you can see by the wonky center seam, I'm still playing with it.
I fell in love with bullet bras the first time I put one on. I think I actually said "Where have you been all my life?!" They're comfortable- with no under wire or modern bra nonsense, they support even a larger gal like myself and they look great under vintage clothes.
A few months ago, I bought my first What Katie Did bullet bra (the Harlow). It's a gorgeous bra in peachy satin with all of the vintage details that I wanted but still, it wasn't my dream bra.
The strap placement creates this awful back fat bulge and they feel like they're going to slip off my shoulders at any moment. I also prefer a thicker strap to support heavy breasts and a higher rise at the sides so there isn't any spillage. It seems like the cup size isn't full enough for me, even on the larger sizes.
They did a beautiful job on it, honestly. It is a very comfortable bra (strap issue aside) and very well constructed but I feel like if I need to make adjustments to a garment to make it perfect, I probably don't need to be spending $55 on it in the first place.
I'm sure many people wonder, why on Earth would a woman with an already prominent bust want to wear something that pointy? This is why I am madly in love with a nice pointy bra...
❤ Bullet bras provide amazing support to very heavy breasts, relieving back pain without the need of under wire
❤ with modesty in mind, a bullet bra provides complete coverage of the breast. No spilling up top, no side-boob, everything is neatly lifted and held in place with light fabric and spiral stitching
❤ Women with heavy breasts have a problem with sagging- I'm only 27 and they droop! A bullet bra lifts the breasts off of the torso, giving a longer, slim look to the whole body.
❤ You know that squished feeling you get with a flimsy modern bra? Like you might just spill right out the bottom? A bullet bra's stitching around the entire cup supports from the bottom as well: no fall-out
❤ Without clothes over the bra, they do look abnormally pointy but with a vintage dress or sweater over the top, it's not as pointed as you think. I stay away from padded bullet bras, which look like road cones under my blouse but a simple cotton or satin non-padded bullet like the one I made is lovely. I wear bullet bras or some other variety of a pointy vintage bra every single day!
❤ Don't they make a big chest look bigger? There's something quite magical about a bullet bra. Maybe it's just me, but I feel like they make a smaller bust more prominent while minimizing the look of a larger bust.
I've tried this on myself with modern and vintage bras and I actually have an easier time buttoning blouses with no button gap while wearing a bullet bra. Maybe they squish a lot of the fat closer to the body? I don't know what it is, but I love it!
I'm working on perfecting my bullet bra pattern and making it in other sizes so I can show you ladies how to sew your own amazing bullet bras. Stay tuned for the free patterns and instructions as soon as I can get them just right!
Have you ever worn a bullet bra? Did you like it or not? What is your problem area with bra fitting?
For the Love of Bullet Bras
4/26/13
 |
| source |
Yesterday, I finally sewed a bullet bra- something that has been on my must do list for years. I created the pattern, cut the fabric and completed the whole bra all in about an hour. It's my first attempt and needs a few more small changes to make it perfect but I am so pleased with it!
I used this silly fruity print cotton from my stash. I love this bra to pieces. It's so comfortable, I could sleep in it! As you can see by the wonky center seam, I'm still playing with it.
I fell in love with bullet bras the first time I put one on. I think I actually said "Where have you been all my life?!" They're comfortable- with no under wire or modern bra nonsense, they support even a larger gal like myself and they look great under vintage clothes.
 |
The strap placement creates this awful back fat bulge and they feel like they're going to slip off my shoulders at any moment. I also prefer a thicker strap to support heavy breasts and a higher rise at the sides so there isn't any spillage. It seems like the cup size isn't full enough for me, even on the larger sizes.
They did a beautiful job on it, honestly. It is a very comfortable bra (strap issue aside) and very well constructed but I feel like if I need to make adjustments to a garment to make it perfect, I probably don't need to be spending $55 on it in the first place.
I'm sure many people wonder, why on Earth would a woman with an already prominent bust want to wear something that pointy? This is why I am madly in love with a nice pointy bra...
❤ Bullet bras provide amazing support to very heavy breasts, relieving back pain without the need of under wire
❤ with modesty in mind, a bullet bra provides complete coverage of the breast. No spilling up top, no side-boob, everything is neatly lifted and held in place with light fabric and spiral stitching
❤ Women with heavy breasts have a problem with sagging- I'm only 27 and they droop! A bullet bra lifts the breasts off of the torso, giving a longer, slim look to the whole body.
❤ You know that squished feeling you get with a flimsy modern bra? Like you might just spill right out the bottom? A bullet bra's stitching around the entire cup supports from the bottom as well: no fall-out
❤ Without clothes over the bra, they do look abnormally pointy but with a vintage dress or sweater over the top, it's not as pointed as you think. I stay away from padded bullet bras, which look like road cones under my blouse but a simple cotton or satin non-padded bullet like the one I made is lovely. I wear bullet bras or some other variety of a pointy vintage bra every single day!
❤ Don't they make a big chest look bigger? There's something quite magical about a bullet bra. Maybe it's just me, but I feel like they make a smaller bust more prominent while minimizing the look of a larger bust.
I've tried this on myself with modern and vintage bras and I actually have an easier time buttoning blouses with no button gap while wearing a bullet bra. Maybe they squish a lot of the fat closer to the body? I don't know what it is, but I love it!
I'm working on perfecting my bullet bra pattern and making it in other sizes so I can show you ladies how to sew your own amazing bullet bras. Stay tuned for the free patterns and instructions as soon as I can get them just right!
Have you ever worn a bullet bra? Did you like it or not? What is your problem area with bra fitting?
Regency Era Shoes from American Duchess
4/25/13
 |
| source |
I love a fabulous heel, a flirty wedge, a sturdy boot- but the one shoe I wear more than the rest is a durable basic flat. You can walk all day, dance all night and maybe play and run a little in between with a perfect pair of flats and I'm sure everyone is excited about the newest addition to the American Duchess line- the Highbury Dyeable Satin Regency Flat

The Highbury is made with American made satin, which dyes to a rich, vibrant and even color. Highbury is the first in the American Duchess line to use this fine satin. The shoe is lined in leather with a flat man-made sole and subtle spring heel. For information on how to dye your Highbury shoes, see Lauren's video below.
The Highbury is such a versatile shoe, with interior loops to add lacing ribbons, which can be changed out to suit your dress. This shoe is historically accurate for costumes from 1790 through 1810 with its pointed toe, side seams and high vamp.

Highburys have been on pre-order this month and will be available in the shoe shop this summer but if you absolutely can't wait for a beautiful regency shoe, also check out the Pemberley Regency Slipper in fine dyeable leather with a comfortable low heel, currently on sale.
How to Decorate on the Cheap with Vintage Ads
4/24/13
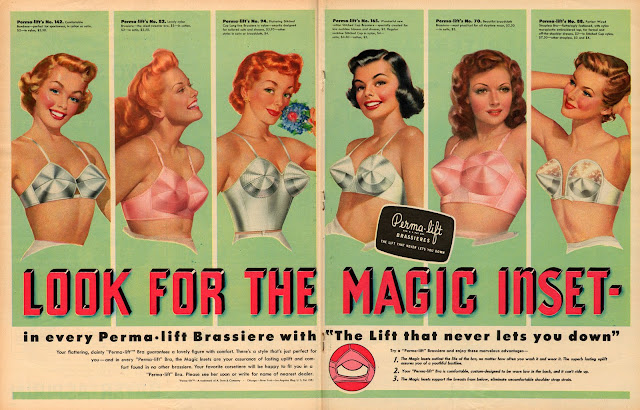
Vintage advertisements often include gorgeous artwork. Some are funny or reflect the state of society during that era. They're colorful, unique and really should be displayed! I always buy old magazines when I find them, not only for the reading and inspiration but for decorating.
Some of my local antique malls sell vintage ad pages for a buck or two per page so I can stock up on a bunch of colorful pieces for less than the cost of a burger and fries. A single magazine or catalog is loaded with beautiful pages so if you can score one online or out shopping, you can decorate the whole house!
This 1940's lingerie ad is my absolute favorite. She adds some color to the bathroom.

Trim the ads or if they are already small, lay them out on a background of pretty vintage wallpaper, wrapping paper or scrapbook paper.

I use garage sale or dollar store frames throughout my house. You can also find really cheap frames at thrift stores. If you don't like the color, a coat or two of spray paint does the trick!

Make collages in a single frame or group similar ads together on a wall. Line the kitchen with funny food and drink ads and deck the bathroom with cosmetics and lingerie pages. I hang a few of my favorite makeup and fashion ads in the bedroom for inspiration while I'm getting ready for the day.


Vintage ads bring color and kitsch to a room and those who visit your home will enjoy your gallery of life in the past.
Other Ideas for Vintage Ads
Mod Podge them to a jewelry or hat box, wooden bangle bracelets, table tops, etc.
Scan them and print on iron-on transfers for tee shirts and tote bags.
Make greeting cards for birthday, baby and wedding showers and holidays
*if an ad is really special, make a color copy so you can save the original for framing*
fashion
outfits

This morning we had some errands to run and while stopping at a small neighborhood grocery store, I spotted signs for garage sales all over the place. I was almost able to contain myself when I saw a sign on the same street that I bought my 1950's china cabinet from last month.
I remember going inside and seeing all kinds of kitchen pretties, vintage figurines and furniture that were being prepared for an estate sale in a few weeks so my heart skipped as I saw that the china cabinet house was now holding a garage sale!
The first find was this funny vintage dress with a full skirt, red piping and a large Missouri patch with the words "St Louis" embroidered on it.
What a strange dress, right? Well, I later found a pattern in a box of craft books for a square dancing dress so I'm guessing that this lady was a competition square dancer or something of that nature.
I desperately wanted to get my hands on some of the glass figurines, of which I found a few!
Also among the pretties was a box of craft books- mostly The Teddy Bear Review and other old lady craft books from the 80's but I did find three late 30's and early 40s quilt pattern books and two late 50's Christmas booklets. I will be scanning the books, especially the one on how to wrap presents to post for you here because there are some KILLER ribbon how-to's in this book and I must share it with you guys!
I also left with a vintage peachy lace shower curtain (background above) for my pink bathroom and a very pretty mid century bowl with lid. I've seen this pattern online before but now I can't seem to find it and there are no markings. Does anyone know what the pattern is?
And finally, the most awesome thing to come into my house today was my little niece, Miss Junebug, born less than two weeks ago! She did a whole lot of snoozin' and being held and kissed by her cousin, Olivia.

The St Louis Dress and Other Treasures
4/20/13

This morning we had some errands to run and while stopping at a small neighborhood grocery store, I spotted signs for garage sales all over the place. I was almost able to contain myself when I saw a sign on the same street that I bought my 1950's china cabinet from last month.
I remember going inside and seeing all kinds of kitchen pretties, vintage figurines and furniture that were being prepared for an estate sale in a few weeks so my heart skipped as I saw that the china cabinet house was now holding a garage sale!
The first find was this funny vintage dress with a full skirt, red piping and a large Missouri patch with the words "St Louis" embroidered on it.
 |
What a strange dress, right? Well, I later found a pattern in a box of craft books for a square dancing dress so I'm guessing that this lady was a competition square dancer or something of that nature.
I desperately wanted to get my hands on some of the glass figurines, of which I found a few!
 |
Also among the pretties was a box of craft books- mostly The Teddy Bear Review and other old lady craft books from the 80's but I did find three late 30's and early 40s quilt pattern books and two late 50's Christmas booklets. I will be scanning the books, especially the one on how to wrap presents to post for you here because there are some KILLER ribbon how-to's in this book and I must share it with you guys!
 |
I also left with a vintage peachy lace shower curtain (background above) for my pink bathroom and a very pretty mid century bowl with lid. I've seen this pattern online before but now I can't seem to find it and there are no markings. Does anyone know what the pattern is?
And finally, the most awesome thing to come into my house today was my little niece, Miss Junebug, born less than two weeks ago! She did a whole lot of snoozin' and being held and kissed by her cousin, Olivia.

sewing
Gorgeous Vintagey Fabrics Haul
4/19/13
I went to JoAnne's this morning to pick up fabric for a 1920's dress that I'm making for the next issue of Hey Doll! and I came out with 3 beautiful cotton prints that I had to share. They're having the Daffodil Dash Sale this weekend so these were all 30% off.
The one on the left was the last bit of the bolt. I was hoping for enough yardage for a whole 20's summer dress but sadly, just under two yards on this one so it will probably become a hat and scarf or blouse. I really love this print and the colors- so Art Deco!
The one on the right is down right fabulous, I want to reupholster every piece of furniture in my house, including the curtains, bed spreads and shower curtain in this fabric. Am madly in love!
This gorgeous mid century inspired fabric on the left was an accidental find. I was just moving down the remnants aisle to keep the cart moving so Rhys would chill out and I saw this for $7 a yard plus 50% off. Crazy in love with it as well. This print is going to be throw pillows for my living room...and perhaps a few for my bed.
The one on the right will be my 1920's summer dress from a pattern that I am drafting based on a 1920's pattern from a book. Stay tuned for the pattern, instructions and details of the finished dress in the May issue of Hey Doll Vintage Magazine.....Now what has Beetsie Wan done with my presser foot?
The one on the left was the last bit of the bolt. I was hoping for enough yardage for a whole 20's summer dress but sadly, just under two yards on this one so it will probably become a hat and scarf or blouse. I really love this print and the colors- so Art Deco!
The one on the right is down right fabulous, I want to reupholster every piece of furniture in my house, including the curtains, bed spreads and shower curtain in this fabric. Am madly in love!
 |
| to the left: 2012 DS Quilts Collection for Fabric Traditions to the right "mercer" De Leon Designer Group * The Alexander Henry Fabrics Collection 2012 |
This gorgeous mid century inspired fabric on the left was an accidental find. I was just moving down the remnants aisle to keep the cart moving so Rhys would chill out and I saw this for $7 a yard plus 50% off. Crazy in love with it as well. This print is going to be throw pillows for my living room...and perhaps a few for my bed.
The one on the right will be my 1920's summer dress from a pattern that I am drafting based on a 1920's pattern from a book. Stay tuned for the pattern, instructions and details of the finished dress in the May issue of Hey Doll Vintage Magazine.....Now what has Beetsie Wan done with my presser foot?
 |
| To the left "composition: coral" The Alexander Henry Fabrics Collection 2010 To the right 2012 DS Quilts Collection for Fabric Traditions |
outfits
Today, little Rhys is two years old! He's turning into such a cool little dude and we call him "Beetsie Wan"

It all started when he was a tiny baby. Olivia called all babies "Beets" because she couldn't say Rhys and "Beetsie" as her little nick name for him. So we had Beetsie cats, Beetsie bears, Beetsie babies...all things Beetsie, including a little family of toy swans. And since she couldn't say "Swan" they were "wans" Mommy wan, daddy wan and Beetsie wan. We thought it was so funny, we called him Beetsie Wan or just Beets and the name stuck.
Over the past two years, Va-Voom Vintage readers have seen me through my pregnancy with Beets, his birth and growing up into a tough little man.
He's very into chocolate, watching Backyardigans or "gins" and calling me and his father both "Daddy". He is very much not into having his hair washed, being still or potty training.
He has a really badass scar on his forehead from where he crashed a few months ago and although I cried my eyes out when they glued his noggin back together, all he wanted was a sticker from the nurse. Yep, tough guy!
He likes tattoos, pirates and growling like a monster, yelling "win-o, win-o" when he wants the wind in his hair and being in every single photograph for this blog because he cannot be away from mommy (the daddy lady) for any period of time.


Happy birthday, Beetsie Wan!
Beetsie Wan
4/18/13
Today, little Rhys is two years old! He's turning into such a cool little dude and we call him "Beetsie Wan"

It all started when he was a tiny baby. Olivia called all babies "Beets" because she couldn't say Rhys and "Beetsie" as her little nick name for him. So we had Beetsie cats, Beetsie bears, Beetsie babies...all things Beetsie, including a little family of toy swans. And since she couldn't say "Swan" they were "wans" Mommy wan, daddy wan and Beetsie wan. We thought it was so funny, we called him Beetsie Wan or just Beets and the name stuck.
Over the past two years, Va-Voom Vintage readers have seen me through my pregnancy with Beets, his birth and growing up into a tough little man.
He's very into chocolate, watching Backyardigans or "gins" and calling me and his father both "Daddy". He is very much not into having his hair washed, being still or potty training.
He has a really badass scar on his forehead from where he crashed a few months ago and although I cried my eyes out when they glued his noggin back together, all he wanted was a sticker from the nurse. Yep, tough guy!
He likes tattoos, pirates and growling like a monster, yelling "win-o, win-o" when he wants the wind in his hair and being in every single photograph for this blog because he cannot be away from mommy (the daddy lady) for any period of time.


Happy birthday, Beetsie Wan!
beauty tutorials
hair tutorials
vintage hair
In this month's issue of Hey Doll I wrote a tutorial for my no-tease beehive, which has been my new favorite go-to style. It's very quick and easy and looks cute with any outfit. I don't like to tease my hair if I don't have to. It's not great for the hair and if you want to do a next-day style, without shampooing, forget about it! I'm also not crazy about beehives that have so much backcombing that they look like a bird's nest. The no-tease method can be as tall or toned-down as you like, just use bigger rats for taller beehives. I like a moderate height for daily styles. I'm pretty tall and anything taller hits the roof of the car!
All you need for this look is a hair rat, a ton of bobby pins and a coat of hair spray. I started with curled hair but if you're in a rush, just pin it up, tuck the ends in and you're ready to go! If you don't have bangs, sweep them up as part of your beehive or side part them and pin up. For a more woven look, use smaller sections of hair, wrapped in opposite directions.
See my article in issue 3 for the full how-to
Tutorial: No-Tease Beehive
4/17/13
In this month's issue of Hey Doll I wrote a tutorial for my no-tease beehive, which has been my new favorite go-to style. It's very quick and easy and looks cute with any outfit. I don't like to tease my hair if I don't have to. It's not great for the hair and if you want to do a next-day style, without shampooing, forget about it! I'm also not crazy about beehives that have so much backcombing that they look like a bird's nest. The no-tease method can be as tall or toned-down as you like, just use bigger rats for taller beehives. I like a moderate height for daily styles. I'm pretty tall and anything taller hits the roof of the car!
All you need for this look is a hair rat, a ton of bobby pins and a coat of hair spray. I started with curled hair but if you're in a rush, just pin it up, tuck the ends in and you're ready to go! If you don't have bangs, sweep them up as part of your beehive or side part them and pin up. For a more woven look, use smaller sections of hair, wrapped in opposite directions.
Subscribe to:
Posts (Atom)
Powered by Blogger.


